Difference between revisions of "Linbian Remote Access"
Csjamesdeng (talk | contribs) (→Router Device List) |
Csjamesdeng (talk | contribs) (→FTP) |
||
| Line 161: | Line 161: | ||
</pre> | </pre> | ||
| − | == | + | == Samba == |
| + | |||
| + | Sharing folders to Windows-based devices. | ||
| + | |||
| + | === Installing Samba === | ||
| + | |||
| + | The following commmands will install all the required components for using Samba as a server or a client. | ||
| + | <pre> | ||
| + | $ sudo apt-get install samba samba-common-bin smbclient | ||
| + | </pre> | ||
| + | |||
| + | === Sharing user home folder for use by windows === | ||
| + | |||
| + | Adding user to Samba. | ||
| + | <pre> | ||
| + | $ sudo smbpasswd -a ai | ||
| + | </pre> | ||
| + | |||
| + | Editing Samba configuration file to tell Samba to share the user home folder. | ||
| + | <pre> | ||
| + | $ sudo vim /etc/samba/smb.conf | ||
| + | </pre> | ||
| + | At the end of the file, add the following to share the folder, giving the remote user read/write permissions: | ||
| + | <pre> | ||
| + | [ai] | ||
| + | path = /home/ai/ | ||
| + | available = yes | ||
| + | valid users = ai | ||
| + | read only = no | ||
| + | browsable = yes | ||
| + | public = yes | ||
| + | writable = yes | ||
| + | </pre> | ||
== Web Server == | == Web Server == | ||
== Streaming Server == | == Streaming Server == | ||
Revision as of 08:42, 24 August 2018
IP address
Using the board with a display
Using the terminal (open a Terminal window from the desktop), simply type hostname -I which will reveal your board IP address.
Using the board without a display
Router Device List
In a web browser navigate to your router's IP address e.g. http://192.168.3.1, which is usually printed on a label on your router; this will take you to a control panel. Then log in using your credentials, which is usually also printed on the router or sent to you in the accompanying paperwork. Browse to the list of connected devices or similar (all routers are different), and you should see some devices you recognise. Some devices are detected as PCs, tablets, phones, printers, etc. so you should recognise some and rule them out to figure out which is your board. Also note the connection type; if your board is connected with a wire there should be fewer devices to choose from.
Using your smartphone
The Fing app is a free network scanner for smartphones. It is available for Android and iOS.
Your phone and your Raspberry Pi have to be on the same network, so connect your phone to the correct wireless network.
When you open the Fing app, touch the refresh button in the upper right-hand corner of the screen. After a few seconds you will get a list with all the devices connected to your network.
VNC
Remote access to the board's graphical interface, viewed in a window on another computer.
Installing VNC server
On your board, run the following commands to install the latest version of VNC server.
$ sudo apt-get update
$ sudo apt-get install tightvncserver
Enabling VNC server
Enable VNC Server at the command line using:
$ vncpasswd
$ tightvncserver
Enabling VNC server autostart on boot
- Create a file in /etc/init.d/, eg. tightvncserver.
$ sudo vi /etc/init.d/tightvncserver
Content is as follows:
#!/bin/sh
### BEGIN INIT INFO
# Provides:          tightvncserver
# Required-Start:    $local_fs
# Required-Stop:     $local_fs
# Default-Start:     2 3 4 5
# Default-Stop:      0 1 6
# Short-Description: Start/stop tightvncserver
### END INIT INFO

### Customize this entry
# Set the USER variable to the name of the user to start tightvncserver under
export USER='ai'
### End customization required

eval cd ~$USER

case "$1" in
  start)
    su $USER -c '/usr/bin/tightvncserver -depth 16 -geometry 800x600 :1'
    echo "Starting TightVNC server for $USER "
    ;;
  stop)
    su $USER -c '/usr/bin/tightvncserver -kill :1'
    echo "Tightvncserver stopped"
    ;;
  *)
    echo "Usage: /etc/init.d/tightvncserver {start|stop}"
    exit 1
    ;;
esac
exit 0
- Grant permission to execute the file
$ sudo chmod +x /etc/init.d/tightvncserver
- Update boot list
sudo update-rc.d tightvncserver defaults
Connecting to your board with VNC Viewer
- On your board use these instructions to discover your private IP address.
- On the device you'll use to take control, download VNC Viewer. For best results, use the compatible app from RealVNC.
- Enter your board's private IP address into VNC Viewer:
SSH
Access the command line of the board from another computer. SSH server is enabled by default on Linbian.
Set up your connection
Make sure your board is properly set up and connected. Use these instructions to discover your private IP address.
Set up your client
SSH is built into Linux distributions and Mac OS. For Windows and mobile devices, third-party SSH clients are available.
Using Linux or Mac OS
To connect to your board from a different computer, copy and paste the following command into the terminal window but replace <IP> with the IP address of the board.
$ ssh ai@<IP>
If you receive a connection timed out error it is likely that you have entered the wrong IP address for the board.
When the connection works you will see a security/authenticity warning. Type yes to continue. You will only see this warning the first time you connect.
Next you will be prompted for the password for the ai login: the default password on Linbian is lindeni. For security reasons it is highly recommended to change the default password on the board. You should now be able to see the board prompt, which will be identical to the one found on the board itself.
Using Windows
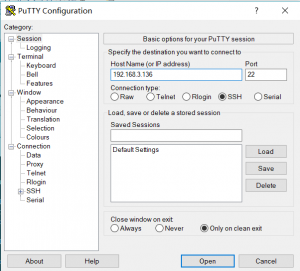
You may need to download an SSH client. The most commonly used client is called PuTTY and can be downloaded from here.
- Add your board as a host
Type the IP address of the board into the Host Name field and click the Open button.
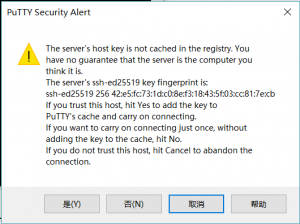
- Connect
When the connection works you will see the security warning shown below. You can safely ignore it, and click the Yes button. You will only see this warning the first time PuTTY connects to a board that it has not seen before.
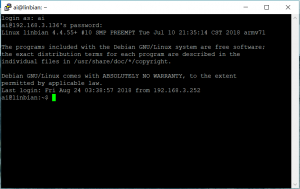
You will now see the usual login prompt. Log in with username ai and password lindeni. You should now have the board prompt which will be identical to the one found on the board itself.
SCP
Copy files between your board and another computer using SCP (Secure Copy Protocol).
Copying files to your board
Copy the file file.txt from your computer to the ai user's home folder of your board at the IP address 192.168.3.136 with the following command:
$ scp file.txt ai@192.168.3.136:~/
Copying files from your board
Copy the file file.txt from your board to the current directory on your other computer.
$ scp ai@192.168.3.136:~/file.txt .
Samba
Sharing folders to Windows-based devices.
Installing Samba
The following commmands will install all the required components for using Samba as a server or a client.
$ sudo apt-get install samba samba-common-bin smbclient
Sharing user home folder for use by windows
Adding user to Samba.
$ sudo smbpasswd -a ai
Editing Samba configuration file to tell Samba to share the user home folder.
$ sudo vim /etc/samba/smb.conf
At the end of the file, add the following to share the folder, giving the remote user read/write permissions:
[ai]
    path = /home/ai/
    available = yes
    valid users = ai
    read only = no
    browsable = yes
    public = yes
    writable = yes


