Difference between revisions of "Linbian Setup"
Csjamesdeng (talk | contribs) (→Installation) |
(→Download the image) |
||
| (12 intermediate revisions by one other user not shown) | |||
| Line 1: | Line 1: | ||
| + | [[zh:Linbain安装]] | ||
== What you Need == | == What you Need == | ||
| − | + | You will need the following to get started with using your Lindenis V5 board: | |
| + | * Windows / Linux PC or MAC with a SD Card Reader connected to the Internet. | ||
| + | * Power Supply (PSU) and a micro usb cable. Please make sure to use a PSU rated at +5V@2A. | ||
| + | * MicroSD card (4GB or higher capacity) rated 'class 10' or better. | ||
| + | * Camera module (recommended). | ||
| + | * HDMI cable (optional). | ||
| + | * Network Cable connected to the Internet (optional). | ||
| + | * Input device(s) such as: keyboard, mouse, etc. | ||
== Installation == | == Installation == | ||
=== Download the image === | === Download the image === | ||
| + | |||
| + | Download the image from [ftp://13.57.226.143/images/ FTP server] with user 'ftp' (password: lindeni). | ||
| + | <br>For China mainland users, you can also download the images from '''[https://pan.baidu.com/s/1iU08tr5TMzQzyNSSwBaM1Q Baidu Netdisk]'''. The key code is "vcss". | ||
| + | |||
| + | Note that there are two type images here. Make sure you download the right one. | ||
| + | * For-SDCard: the image can be written to the SD card | ||
| + | * For-eMMC: the image can be written to the eMMC (you should purchase a eMMC module firstly) | ||
=== Writing an image to the SD card === | === Writing an image to the SD card === | ||
| + | |||
| + | Writing the image to MicroSD Card by Etcher is recommended. | ||
| + | * Using a computer with an MicroSD Card reader. | ||
| + | * Visit [https://etcher.io/ etcher.io] and download and install the Etcher SD card image utility. | ||
| + | * Run Etcher and select the image you downloaded. | ||
| + | * Select the SD card drive. Note that the software may have already selected the right drive. | ||
| + | * Finally, click '''Flash''' to transfer the image to the MicroSD Card. You'll see a progress bar that tells you how much is left to do. Once complete, the utility will automatically eject/unmount the SD card so it's safe to remove it from the computer. | ||
| + | |||
| + | [[File:Etcher.gif|none]] | ||
| + | |||
| + | Now that you have an operating system. You can slot your SD card into your SBC and connect the power. Then you will boot directly to the desktop environment. | ||
| + | |||
| + | === [[Writing an image to the eMMC]] === | ||
== Troubleshooting == | == Troubleshooting == | ||
Latest revision as of 01:56, 29 May 2019
Contents
What you Need
You will need the following to get started with using your Lindenis V5 board:
- Windows / Linux PC or MAC with a SD Card Reader connected to the Internet.
- Power Supply (PSU) and a micro usb cable. Please make sure to use a PSU rated at +5V@2A.
- MicroSD card (4GB or higher capacity) rated 'class 10' or better.
- Camera module (recommended).
- HDMI cable (optional).
- Network Cable connected to the Internet (optional).
- Input device(s) such as: keyboard, mouse, etc.
Installation
Download the image
Download the image from FTP server with user 'ftp' (password: lindeni).
For China mainland users, you can also download the images from Baidu Netdisk. The key code is "vcss".
Note that there are two type images here. Make sure you download the right one.
- For-SDCard: the image can be written to the SD card
- For-eMMC: the image can be written to the eMMC (you should purchase a eMMC module firstly)
Writing an image to the SD card
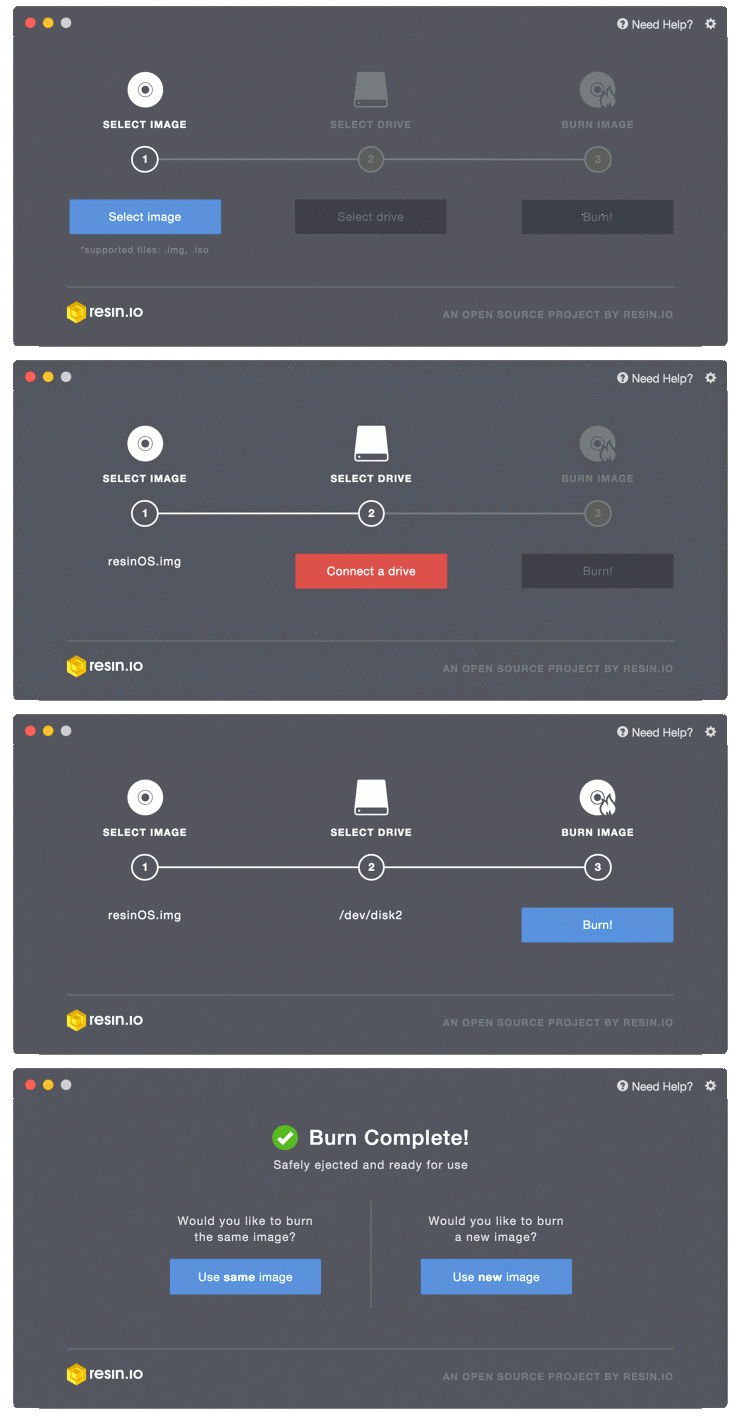
Writing the image to MicroSD Card by Etcher is recommended.
- Using a computer with an MicroSD Card reader.
- Visit etcher.io and download and install the Etcher SD card image utility.
- Run Etcher and select the image you downloaded.
- Select the SD card drive. Note that the software may have already selected the right drive.
- Finally, click Flash to transfer the image to the MicroSD Card. You'll see a progress bar that tells you how much is left to do. Once complete, the utility will automatically eject/unmount the SD card so it's safe to remove it from the computer.
Now that you have an operating system. You can slot your SD card into your SBC and connect the power. Then you will boot directly to the desktop environment.
